Huaheng Welding - Welders should learn the visual defect measurement technology of welds
發布日期:2022-05-16 作者: Kunshan Huaheng Welding Co., Ltd. 點擊:

In order to ensure the quality requirements of welding products, Huaheng Welding should carry out quantitative inspection of welding work, and use data and results to prove the qualification of the work. Welding inspection ruler inspection method is the most convenient and effective method to inspect the appearance quality of welds. , which includes the measurement of excess height, width, misalignment, fillet height, fillet weld thickness, undercut depth, angle, and clearance of the weld.
The visual inspection should clean up the welding slag and spatter on the surface of the workpiece after the welding work, and carry out inspection according to the items listed in the table.
The visual inspection of welded parts is mainly to inspect the weld seam, and the inspection process runs through before welding, during the welding process, and after welding. Visual inspection is generally performed before other inspection methods are performed.
| 1. Preparations for visual inspection of welds |
Before implementing visual inspection, basic equipment and tools for inspection must be prepared, such as artificial light source, reflector, magnifying glass, 90° angle ruler, weld inspection ruler, etc. At the same time, clean the surface of the weldment to be inspected, and remove the paint, oil, welding spatter and other foreign objects on the surface that hinder the surface inspection. The inspection area usually includes 100% accessible exposed surfaces, including the entire weld surface and the adjacent 25mm wide substrate. metal surface.
| 2. Select the detection method |
Visual inspection of welds is a direct visual inspection of a discernible defect if the inspector has access to the inspection area. In general, the distance of visual inspection is about 600mm, and the viewing angle between the eye and the surface of the workpiece to be inspected is not less than 30°. In the inspection process, appropriate lighting can be used, the reflector can be used to adjust the illumination and observation angle, and the bottom magnifying glass can be used to observe, so as to improve the ability of the eyes to find and distinguish defects.
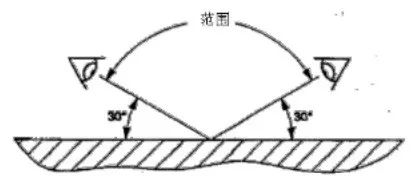
Welds that are not accessible to the eyes must be observed with the help of telescopes, inner bore pipes, etc. The equipment used shall at least be capable of visual inspection of the same effect.
| 3. Visual inspection of welding defects |
The defects that usually exist in the welding seam include unreasonable appearance and shape, defects generated in the welding process, etc. When detecting the defects of unreasonable weld shape, the welding ruler is often used for inspection.
1. Welding inspection ruler
The welding inspection ruler is mainly composed of three parts: the main ruler, the sliding ruler and the oblique ruler. It is suitable for products and components with high welding quality requirements, such as boilers, pressure vessels, etc. This product is made of stainless steel, with reasonable structure, beautiful appearance, convenient use and wide applicability. It is a necessary measuring tool for welders.
2. Measurement of the excess height of butt welds
When measuring the excess height, for each weld, place one foot of the gauge on the base metal, and the other foot is in contact with the top of the excess height, and the value of the excess height can be read on the slip gauge.
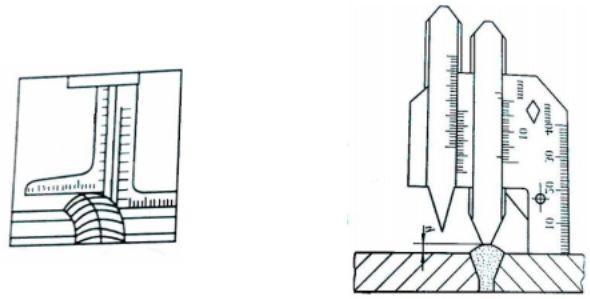
3. Width measurement
To measure the width of the weld, first use the main measuring angle to close to one side of the weld, then rotate the measuring angle of the multi-purpose ruler to close to the other side of the weld, and read the indication of the weld width.
4. Offset measurement
When measuring the misalignment, first use the main ruler to close one side of the weld, then slide the height gauge to make it contact with the other side of the weld, and the height gauge contacts the other side of the weldment, and the value indicated by the height gauge is the misalignment.
5. Solder foot height measurement
When measuring the height of the fillet weld, use the working surface of the ruler to abut the weldment and the weld, and slide the height gauge to make contact with the other side of the weldment.
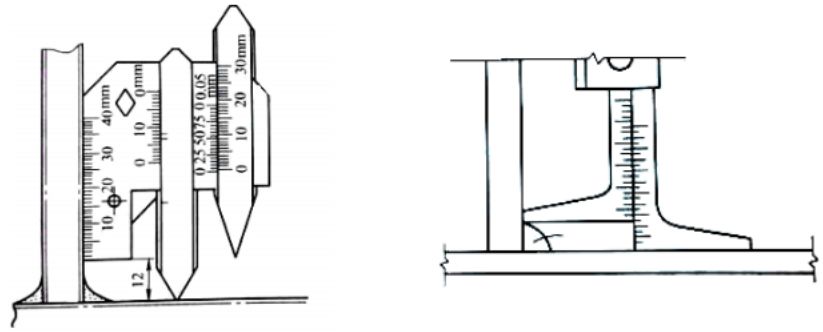
6. Fillet weld thickness measurement
When measuring the thickness of the fillet weld, close the working surface of the main ruler to the weldment, and slide the height gauge to contact the weld, and the height indication is the thickness of the fillet weld.
7. Undercut depth measurement
When measuring the undercut depth of the plane, first align the height with the parts to fasten the screw, and then use the undercut depth gauge to measure the undercut depth. When measuring the undercut depth of the arc surface, first align the undercut depth gauge with the fastening screws of the part, touch the three-point measuring surface to the workpiece (do not place it on the welding seam), and lock the height gauge. Then loosen the undercut depth gauge, place the ruler at the measuring place, move the undercut depth gauge, and its indication is the undercut depth.
8. Angle measurement
When measuring the angle, the main ruler and the multi-purpose ruler are respectively close to the two faces of the measured angle, and the displayed value is the angle value.
9. Gap measurement
Insert a multi-purpose ruler between the two weldments to measure the assembly gap between the two weldments.
The defects caused by the welding process mainly include surface pores, surface cracks, welding flashes, undercuts, and arc damage. Surface pores are generally spherical and can be distributed in groups or evenly. Surface cracks may be longitudinal, or transverse, or star-shaped. Surface pores mainly appear on the weld surface or toe end. When testing, the diameter of the pores can be measured directly with a ruler, or with the aid of a magnifying glass, the size of the pores can be measured with a ruler. Cracks are generally observed with a low magnification magnifying glass. Welding flashes are usually directly observed visually. We can judge whether there is a flashing defect by measuring the angle between the tangent of the weld metal and the base metal. If there is no welding flash, the angle between the tangent and the base metal will be Equal to or greater than 90°, if there is a weld flash, the angle between the tangent and the base metal will be less than 90°, as shown.

The above is Huaheng Welding's explanation on "Welders should learn the visual defect measurement technology of welds". Kunshan Huaheng Welding Co., Ltd. provides global customers with the development, design, manufacture, installation, commissioning and after-sales service of automated welding, cutting equipment, intelligent warehousing and logistics systems and intelligent flexible automated production lines.


 中文
中文
